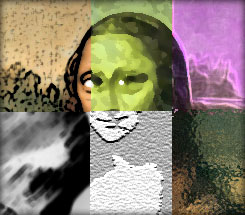
Mega Mona
- February 11, 2013
- By Michael Kline
 Have you ever seen the Mona Lisa? I mean in real life, not online or in a book. A couple of years ago–after saving many of our dollars–my wife and I were able to hop the pond and spend some time in London and then Paris. Our hotel in the famous French city was within a stone’s throw of the Louvre museum, so it was quickly determined that several hours spent perusing the most famous works of art was on the schedule.
Of course, the culmination of that time would be in visiting perhaps the most famous painting of all time, Leonardo DaVinci’s Mona Lisa. Rendered somewhere between 1503 and 1506, the Portrait of Lisa Gherardini, wife of Francesco del Giocondo (I can see why someone shortened the name) stands quite literally as a massive icon of the Renaissance period. And though I had prior knowledge as to its actual physical size, I was still quite surprised to see it live (kids refer to this as 3D). This monumental, often discussed, tour de force of 16th century art actually measures only 30 inches high and 21 inches wide. Needless to say, the room which holds the Mona Lisa somewhat overpowers the piece itself, most likely to accommodate the millions of people who visit the painting, just to say “I thought it would be bigger.”
Seeing it reminded me of a fun classroom project that my fellow students and I often got involved in, that of creating a giant masterpiece (or mess-terpiece as some would refer to it). This will take just a bit of math, but it’s easy enough to figure it out. Hey, if I can do it…
Here’s how it works: Find a famous painting online; it doesn’t have to be the Mona Lisa per se, and it doesn’t necessarily have to be in color either. Print the image as large as possible, say up to 11×17 inches (depending upon the dimensions of the artwork itself), then trim away the excess border. Flip the image, and on the back of it, draw a grid containing roughly the same number of spaces as students you have in your class, ergo, 20 students, a 4×5 grid.
Number each grid section and make a note of which end is up (on the back, not to interfere with the art itself–this will come on very handy when reassembling the art), then with a pair of scissors, cut the image into smaller pieces. Don’t worry if you have too many. Someone is always willing to take up the slack and do two sections; or you could always do one yourself. Then hand out the smaller pieces, give your students a larger piece of blank paper (roughly the same ratio as the smaller versions, though this is not terribly important), and ask them to duplicate on the larger sheet of paper exactly what they see on the smaller version.
It’s at this point that some artistic license can be handed out as well. Give the kids a chance to be expressive with their application. They should be allowed to use crayons, watercolor, ink pens, thumbprints (with an ink pad), finger paint, cut paper and glue… it really doesn’t matter what they use as long as the finished product roughly equates to the sample. That’s why we refer to it as ‘art.’
Once the larger versions have been completed, assign the class the task of reassembling the masterpiece upon a wall of the classroom, or better still, adjacent hallway (for everyone to see). This is where the numbered and oriented grid system comes into play. Your students should be rewarded with a giant-size copy of a famous work of art. Not only does this approach help expand the artistic vision of your class, it becomes a great team-building exercise as well.
And it’s much cheaper than going to Paris. 🙂
Teach. Learn. Enjoy!