The Kid Who Drew Too Much
- July 10, 2014
- By Michael Kline
 When I was much younger, I drew on everything; and I do mean everything. Walls, back seats of cars, restaurant menus (not the coloring pages, the menus), my arms and legs, and prophetically most of the books on our home shelves. So it stands to reason that I became an illustrator. I did manage to sit still through 4 years of a BFA in Graphic Design, but my allegiance was to drawing and all things that come from one’s brain and ends up on one’s paper (or screen these days).
Given my penchant for art, and owing to the genre in which I function best (publishing for children), I’m often asked to make appearances at classrooms and libraries, where instructions, advice, and techniques are handed out like cheap candy on Halloween. And I’d like to share some of those basic drawing exercises with you. Keep in mind that none of these are considered Nobel-worthy lesson plans… Rather, they are intended to teach children how to approach their own artistic vibe from a new and very different perspective.
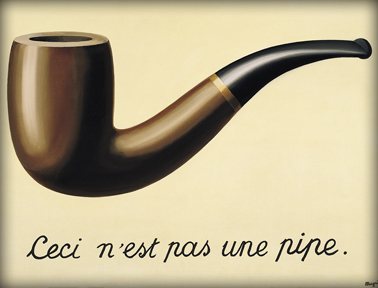
1) “Ceci n’est pas une pipe” (This is not a pipe)
In René Magritte’s 1928 painting The Treachery of Images, he produces an image of a smoking pipe, and famously states underneath that “This is not a pipe.” which becomes the basis for nearly all art. And just why is it not a pipe? Simple really. It’s a painting of a pipe.
Draw a simple picture of a dog or cat, or whatever you’re comfortable with, and ask your students to identify it. Of course, most will say dog or cat. Then point out to them that they have just made the leap of faith that all artists count on; from image to thought.
2) Not Like Me
The second lesson involves having each student follow your lead as you draw out something in front of them, line by line. Keep it simple, then ask each student to show their work. Now, ask them to tear it up and throw it away while emphasizing “Do not draw like me. Draw the way you want to draw.” I’ve found this activity to be a lot of fun, but I cannot overstate a child’s zeal for tearing things up and throwing them. Your call…
3) Switch!
Have your students stick with the same object (I like to start with aliens because there is no right or wrong way to draw an alien), and ask them to begin a new illustration. After about 30 seconds, stop them, and ask them to switch their pencils to their non-dominate hand. You’re likely to receive several complaints, but explain to them that they are now employing a part of their brain that they have not used before. The art will take on a decidedly Picasso-esque flavor, and will make for some great observations. Ask your students why they think it is so hard to draw (or write for that matter) with their other hand, and point out to them that when they were small, their dominant hand did not know how to draw either. We call that “practice.”
4) Lights Out
After suffering through the right-handed/left-handed excursion, tell your students to go back to their dominant hand and begin a new masterpiece. As before, let them settle in briefly, then ask them to draw this time with their eyes closed. This is probably one of the more trying lessons, but great fun can ensue. Allow the kids to place their pencil on the paper in a favorable position, and ask them to begin. They may open their eyes to view their creations, but only after the pencil has come off the paper. Let them start and stop as often as necessary, and you’ll find that many will try to go longer each time without peeking.
5) Art Marathon
Time for a little art marathon! On letter-sized pieces of paper, have your students draw a grid of simple boxes (as in 12 total, 3 across and 4 down, as long as they’re alike). Ask them to label each one underneath with names such as clown, sad tree, pencil, little girl, city; as long as you leave at least two of them with more challenging titles like plantain (you may have to help with the spelling), nucleus, old pencil, or computer problem. All sheets of paper should have the same information…
Now have your students begin the marathon. Each is given 30 seconds to illustrate whichever object they choose, then they must pass their sheet to the next person. Then the process begins again, until the sheets have been passed a total of 12 times, covering every object on the list. (You may need to serve as the runner for sheets coming from the back of the room! Yes, a marathon for you too!)
When it’s all over, have the kids compare their artwork and enter into a discussion. You’ll see a wide variety of styles and approaches emerge. You’re also likely to see that some subjects are understandably more difficult, but therein lies another teaching moment.
And by the way, a plantain is a close cousin of the banana… just don’t draw it the way I do. 🙂
Teach. Learn. Enjoy!


